Welcome to COMP110 - Introduction to Programming at UNC Chapel Hill!
0. Complete the Prerequisites
Before continuing on, be sure you’ve completed each of the following steps to prepare your computer for the course’s programming assignments:
1. Starting from the Trailhead
Before opening up VSCode, you will want to be sure Docker Desktop is running on your computer. On a Mac, you can check this by looking for the whale with boxes icon in your top menu bar. On Windows, you can check this by looking for the whale with boxes icon in your system tray. If you do not see the icon, open the Docker Desktop application from your start menu or applications folder.
Our programming journey begins in Visual Studio Code, a free, leading text-editor designed for software development. Go ahead and open Visual Studio Code!
Once open, from the “File” menu, select “Open Recent…”. After completing the setup instructions above, you should see two entries with comp110-24ss1-workspace-[Your GitHub Username]. You want to select the one with [Dev Container] at the end of it. Go ahead and open it up!
You should be greeted with window that looks like the following (if tabs are open in the main part of the window, you can close them):
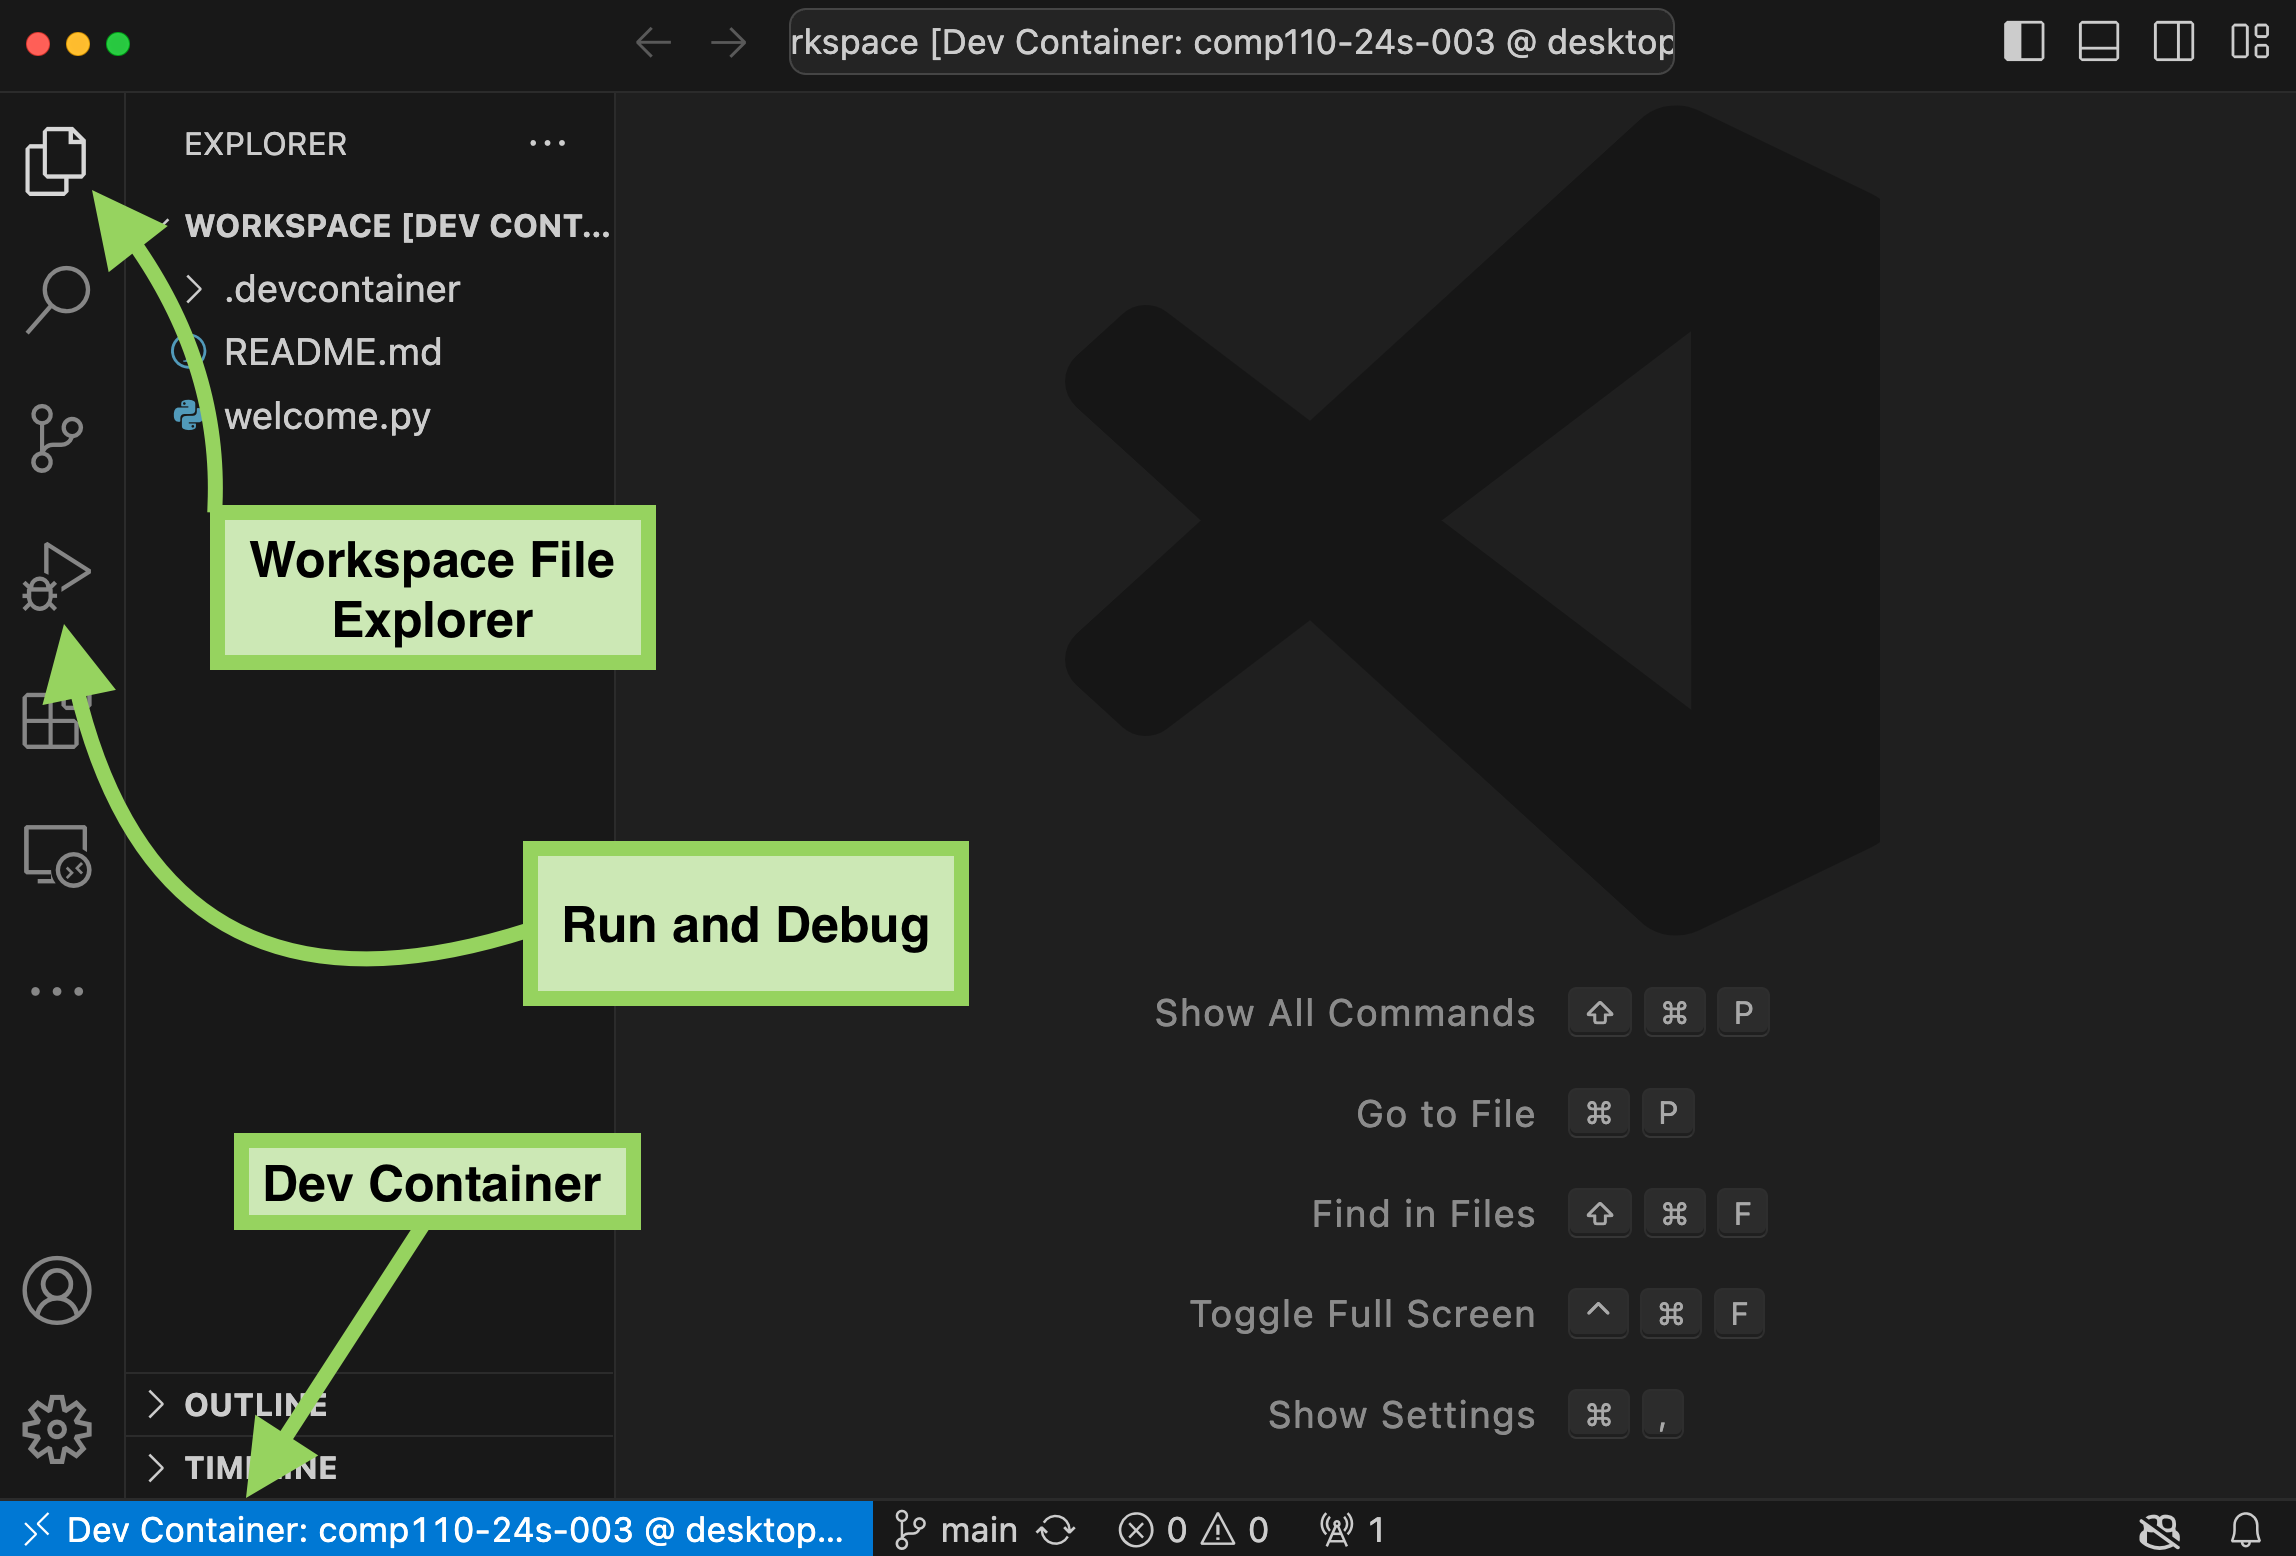
There are three important parts to recognize in this window you will make use of through the semester:
In the bottom left corner, you should see “Dev Container: comp110-24ss1” as shown in the photo above. If you only see the
><icon, open the VSCode command palette by pressingCtrl+Shift+P(orCmd+Shift+Pon Mac) and type “Reopen in Container”. This will open the Dev Container and you should see the “Dev Container: comp110-24ss1” appear.In the top left corner, you will see an icon with two files that represents the “File Explorer”. Clicking it will open, or toggle closed if it is already open, a panel that shows the files and directories in your workspace.
Finally, there is a sidebar button with a Play icon and a bug for the “Run and Debug” panel. This panel is where you will start the Trailhead app from. You will learn about additional “debugging” capabilities found in this panel soon.
2. Starting Trailhead
Open the “Run and Debug” pane, as discussed above, and press the green play button. You should see a new terminal window open in the bottom of the screen and a message that says “Starting Trailhead server at http://localhost:1110” appear in a terminal. You can close this terminal pane with the X after seeing this message.
As shown in the video above, your next step is to open a web browser (Google Chrome is recommended for our course) and navigate to http://localhost:1110. You should see Trailhead’s home page! If you do not, try the address http://127.0.0.1:1110 instead. These two web addresses, localhost and 127.0.0.1 refer to your personal computer and the :1110 refers to the “port number” Trailhead is running on. One-thousand 110, hopefully a memorable number :)
From the “Trailhead” home screen, your workspace’s modules are listed. The “welcome” module refers to the welcome.py found in the “File Explorer” pane of VSCode. Opening the “.py” file, you can see the code which resulted in the message being displayed in Trailhead.
We recommend keeping VSCode and your browser, with Trailhead open, side-by-side such that you can see both at the same time. As you are writing programs, you will want to see and interact with the results of your work in the Trailhead browser window.
3. Writing Your First Program
In Trailhead, navigate back to the home page by clicking “Trailhead” in the navigation.
In VSCode, open the “File Explorer” pane and right-click in the blank space. Select “New File” and name the file ex00_hello_world.py. Double check that the filename exactly matches what is specified here. In Trailhead, you will see the your new module appear. If you click to open it, you will see that the “module exited without output.” This is because the file is empty.
Open the ex00_hello_world.py file in VSCode and type the following:
print("Hello, world!")What is this line of code doing? You are calling a function named print. The print function is built-in to the Python programming language and results in data being “printed” out somewhere. By default, that somewhere is on your screen in the Terminal. The parentheses following the word print indicate extra information being given to the print function. In this example, you are giving a piece of textual information to print which is called a “string” and denoted by the double quotes surrounding the textual data. Don’t worry, we will break down all of this into more tangible detail soon!
Save the file again, by pressing Ctrl+S (or Cmd+S on Mac). In Trailhead, you should see the message “Hello, world!” now appear as output. This should happen automatically upon saving, but you can also manually run the program again with the green “Run Again” or “Rerun” button.
Congratulations! You have written your first program in Python! For over fifty years, it’s been a rite of passage for new programmers’ first program to print “Hello, world!” to the screen. Wooo! You’ve taken your first step on the trail to becoming a programmer!
Your first program is almost complete! However, before submitting it there are a couple more style and documentation steps to complete.
First, you should add a special kind of string value, called a docstring short for documentation string, to the top of your program file, which is a Python module. Then, you should add a line with a special variable named author assigned to be your 9-digit student PID. (Disclaimer: Out in the real world the __author__ variable is typically your name and e-mail address, but since we will grade your programs we’d like to avoid potential bias in seeing your names as part of the programs as we’re grading.) Add the following lines above the line of code that calls the print function. Fill in your 9-digit UNC PID number, without any spaces or dashes, in the __author__ string.
"""My first program for COMP110."""

__author__ = "1234567890"
Save your program again and re-run it. You should still only see your printed output message. What must that mean about the two lines of code you just added? They’re for documentation purposes and must not impact the printed output of the program.
4. Make a Backup Checkpoint “Commit”
Now that your first program is complete, let’s practice making a backup. Visual Studio Code has built-in support for git source control management (SCM). SCM tools are made to help create versioned checkpoints of a project’s source code (your program is source code!) amont other uses. The current de facto SCM is called git. As one more piece of terminology, a checkpointed version in git is called a commit. Once your work is in a commit checkpoint, you can always return back to your project at that point in time without the risk of losing work. We encourage committing work to backup at least each time you submit a project for grading or are finishing out a working session for the day. Commits are free to make and can only help you avoid losing work; use them liberally!
- Open the Source Control panel (Command Palette: “Show SCM” or click the icon with three circles and lines on the activity panel).
- Notice the files listed under Changes. These are files you’ve made modifications to since your last backup.
- Move your mouse’s cursor over the word Changes and notice the + symbol that appears. Click that plus symbol to add all changes to the next backup. You will now see the files listed under “Staged Changes”.
- If you do not want to backup all changed files, you can select them individually. For this course you’re encouraged to back everything up.
- In the Message box, give a brief description of what you’ve changed and are backing up. This will help you find a specific backup (called a “commit”) if needed. In this case a message such as, “Finished Exercise 00!” will suffice.
- Press the Check icon to make a Commit (a version) of your work.
- Open the View menu and select Command Palette, the shortcut for this menu is:
- Windows:
Control+Shift+P - Mac:
Command+Shift+P
- Windows:
- Begin typing in:
Git: Push to...and pressEnteronce it is the first option. - Select the
backupremote that is your personal workspace on GitHub. If you do not seebackuplisted, see the instructions below on Setup Backup Course Material Repository.- You may see a spinning “refresh” icon in your status bar at the bottom of VSCode. Unless an error backing up occurs, you will not see any confirmation.
To see your commit on Github, in a web browser, navigate to https://github.com/comp110-24ss1/comp110-workspace-USERNAME and substitute USERNAME with your GitHub username. Open the comp110 directory and ex00_hello_world.py you’ll see the work you just completed backed up to GitHub. Notice above the file’s content’s you’ll see your commit message.
If you get an error
If you get an error when trying to commit try typing the following two lines in your terminal:
git config --global user.name "Your Name"
git config --global user.email "you@example.com"
Replacing “Your Name” with your name and “you@example.com” with your UNC email.
5. Submit to Gradescope for Grading
All that’s left now is to hand-in your work on Gradescope for grading!
Before doing so, you need to know that before an assignment’s deadline you can resubmit work as many times as you need to without penalty. Portions of assignments are autograded and will provide near-immediate feedback. We want you to resubmit as many times as it takes you in order to earn full autograding credit!
Login to Gradescope and select the assignment named “EX00 - Hello, world.”. You’ll see an area to upload a zip file. To produce a zip file for autograding, return back to Visual Studio Code.
If you do not see a Terminal at the bottom of your screen, open the Command Palette and search for “View: Toggle Integrated Terminal”.
Type the following command (all on a single line):
python -m tools.submission ex00_hello_world.py
In the file explorer pane, look to find the zip file named “yy.mm.dd-hh.mm-exercises-ex00_hello_world.py.zip”. The “yy”, “mm”, “dd”, and so on, are timestamps with the current year, month, day, hour, minute. If you right click on this file and select “Reveal in File Explorer” on Windows or “Reveal in Finder” on Mac, the zip file’s location on your computer will open. Upload this file to Gradescope to submit your work for this exercise.
Autograding will take a few moments to complete. For this exercise there will be no “human graded” component, but in future exercises and projects there will. Thus, you should expect to score 100 out of 100 possible points on this assignment. If there are issues reported, you are encouraged to try and resolve them and resubmit. If for any reason you aren’t receiving full credit and aren’t sure what to try next, come give us a visit in office hours!
6. Congratulations!
There were a lot of steps and new concepts thrown at you in this initial exercise. Gearing up is half the battle! The amount of setup involved in a modern development environment can be a little overwhelming to a first-time programmer. You are not expected to understand the intricacies of all the processes and software you just followed and setup. That will come with time. For now, focus on the big win that is having written a Python program in a professional code editor, run it, and backed it up using git! Programming gets way more fun, and way more creatively rewarding, as we make our way up the mountain from here.